The current version is at
http://code.google.com/p/jcrasher/
All software is provided "as is".
JCrasher Classic: Software--Practice & Experience 2004
The JCrasher Test-Case Planner and JUnit Runtime Extension
jcrasher-planner-0.2.7.jar--sources and executables to run JCrasher as a Java stand-alone application.jcrasher-runtime-0.2.7.jar--sources and executables needed when executing the JCrasher-generated test-cases,
that is, at JUnit runtime to classify exceptions as robustness bugs.
Junit-ReInit--Our Fast-But-Maybe-Incorrect JUnit with Fewer Side-Effects Between Test-Cases
junit-reinit-0.2.7.jar--sources and executables of our fast
but-maybe-incorrect modification of JUnit 3.8.1.
Our modification reduces side-effects between JUnit test-cases by executing a copy of each testee class's static initializer
before each test case. It also groups exceptions together that have the same stack-trace.junit-reinit-0.2.8.jar--sources and executables as above,
but supports turning off the reinitialization by passing -reinit as the first parameter to
edu.gatech.cc.jcrasher.junit.textui.RaGTestRunner.- Junit-ReInit requires the following libraries developed by the Apache Software Foundation
(http://www.apache.org/)
bcel-5.1.jar--executables of the BCEL 5.1 bytecode engineering library,
which junit-reinit-0.2.7.jar uses to modify testee classes at load-time.jakarta-regexp-1.3.jar--executables BCEL 5.1 requires.
JUnit-MultiCL--Our Slow-But-Correct Alternative to Junit-ReInit
junit-multicl-0.1.9.jar--sources and executables of our slow-but-correct modificaton of JUnit 3.8.1.
It provides correct class re-initialization ordering by using multiple class-loaders.
Using JCrasher without Eclipse
The following assumes that you have already installed Java version >= 1.4.
- Make sure that the following are all reachable via your classpath:
- Your subject classes to be tested.
- The above jar files
jcrasher-planner, jcrasher-runtime,
junit-reinit, bcel, and jakarta-regexp.
- Compile your subject classes like
javac P1.java
- Run the JCrasher Application, pass it the qualified class-name for each class you want to test, separated by blank--for example, P1:
java edu.gatech.cc.jcrasher.JCrasher P1
JCrasher puts generated test classes in the same folder where it has found the class file under test.
So now we should have P1Test.java and at least P1Test1.java.
If JCrasher has found the class under test in a jar then the test classes are put
in a new package-style directory relative to your current working directory.
- Compile the testfiles like
javac P1Test.java
- Run the generated sources via our modified JUnit like
java edu.gatech.cc.jcrasher.junit.textui.RaGTestRunner P1Test
Using JCrasher as an Eclipse 2 plug-in
To provide a common case example, the following assumes that you are running Windows and
have already installed Eclipse in c:\Program Files\Eclipse
- Download and unpack
jcrasher_0.1.9_eclipse.zip.
- Move the content (=the directory
cc.jcrasher_X.Y.Z) to
c:\Program Files\Eclipse\plugins
Double-check that you now have the following files
c:\Program Files\Eclipse\plugins\cc.jcrasher_X.Y.Z\jcrasher.jarc:\Program Files\Eclipse\plugins\cc.jcrasher_X.Y.Z\plugin.xml
- Start Eclipse and include both the JUnit and the JCrasher libraries in the projects, in which you want to use JCrasher
- Select the project, right click,
Properties, Java Build Path,
Libraries, Add External Jars...
c:\Program Files\Eclipse\plugins\org.junit_X.Y.Z\junit.jarc:\Program Files\Eclipse\plugins\cc.jcrasher_X.Y.Z\jcrasher.jar
- Select any set of top-level Java types of one of the projects you have prepared above, right click,
JCrasher: Generate JUnit TestCase.
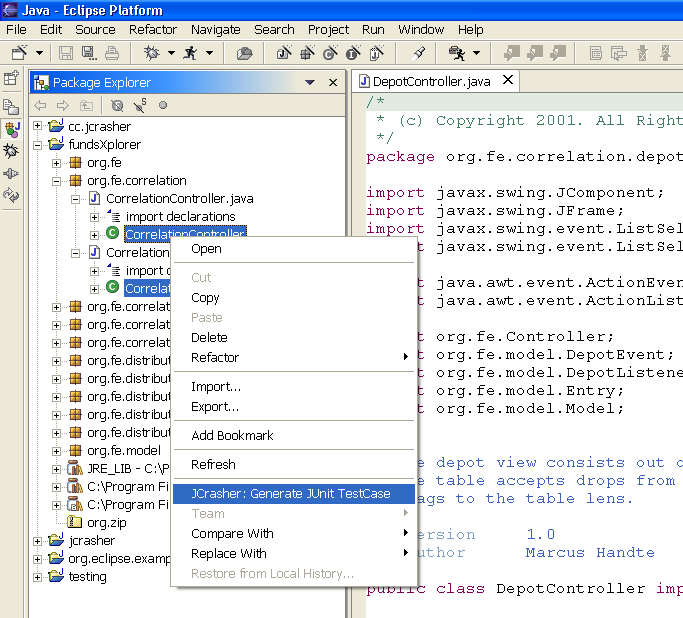
Figure 1. Invoking JCrasher conveniently as an Eclipse plug-in.
- JCrasher puts generated test classes in the same directory in which it has found the class files under test.
So if you have configured your project to use different directories for source and class output, then you might want
to add the project output directory to the project's source directories:
Select the project, right click, Properties, Java Build Path, Source,
Add existing folder, probably bin if you have not modified the default output location.
If JCrasher has found the class under test in a jar then the test classes are put
in a new package-style directory relative to your current working directory.
- Select one of the created test classes and run its test-cases with JUnit--for example, with the JUnit library integrated into Eclipse
or with our JUnit-ReInit as follows
- Download the above
junit-reinit jar file and save it to c:\Program Files, for example.
- Start Eclipse and include the JUnit-ReInit library in the projects, in which you want to use it:
Select the project, right click, Properties, Java Build Path, Libraries,
Add External Jars...
- From Eclipse's project tree select the
junit-reinit jar file and start its
edu.gatech.cc.jcrasher.junit.textui.RaGTestRunner.
- Keep the bar green..
JCrasher 0.8
The following is an example setup:
c:\lib\cnc-0.8.19.jarC:\cs\jcrasher\subjects\p1-s1\
crash.xml is an Ant build script that defines the configuration of the project and the JCrasher componentscrashees.txt defines the classes and packages under testsrc\ contains the project's source code
jcrasher-bin\ will be created by by the crash.xml script and will contain compiled project classesjcrasher-test-src\ will be created by by the crash.xml script and contain JCrasher-generated test sourcesjcrasher-test-bin\ will be created by by the crash.xml script and contain JCrasher-generated test class binariesp1-s1-jcrasher-0.8.19-2005-11-14-2102.zip
will contain JCrasher's results in an archive named
directory-jcrasher-version-date-time.zip
- JCrasher-generated test cases
- Configuration files
- Output of JCrasher and JUnit
See the included changes.txt for details about changes and improvements.
Requirements
- Java 1.5 or later.
- Optional: Ant 1.6.3 or later.
JCrasher contains an Ant build script that compiles the classes under test, generates test cases with JCrasher,
compiles the generated test cases, runs JUnit on the generated test cases, and archives the results in a zip file.
- JCrasher does not require the source code of the classes under test (all versions of JCrasher work at the Bytecode level).